28.5.12


23.5.12


22.5.12

20.5.12


19.5.12


11.5.12

got into Dare. Yaldi!

9.5.12

also been trying to get some mocap stuff working from the big carnegie mellon library, but everything keeps coming up funked up :(

22.4.12

19.4.12

18.4.12


models arent mine, but textures and compile are. multiple skin versions, multiple attachments and proper iron sights and stuff planned.
proof it works in game so far
http://www.youtube.com/watch?v=ovDXZG39KjI&context=C42c0c14ADvjVQa1PpcFMWDiXej3AkFmNBlfZ-sKzx9tNlkxzEqUI=

12.4.12


starting animations for this.

also
https://vimeo.com/40190540
https://vimeo.com/40270502

9.4.12

31.3.12

compiled it all by myself :D anims not mine.

30.3.12

clean and dirty versions, like far cry 2. i like far cry 2.

29.3.12

bollocks for inside the fridge. ill stick it on blendswap tomoz when im sober.

28.3.12


27.3.12

finished up that car (minus an exhaust pipe or wing mirrors, which I forgot. It's not particularly noticeable though, so I'll probably leave it. I can always add those on later.

Unlit, just colour texture:


Lit version, with environment map:

and in a wee environment:

26.3.12

1970 ford torino police. for dare mockups. very quick, no normal maps. only one wheel for uv mapping purposes. planning on working it with very simple textures and environment maps, no normals or specular or anything.

still just high poly for the receiver bit
i also grunged up the texture for the slide
http://www.keenleveldesign.com/modelviewer/m.php?id=4f70675adec15
. in meshbin (online) its just colour, normal, specular, but in these screenshots im using the blender viewport, which has pretty crappy specular support, so in them I'm also using a grayscale version of the spec map as a mask for the environment reflection, which is a lot closer to the default source engine shading, and I plan on getting this into source eventually anyway.

may as well get the rest of it done.probably put the grip on another 1024 then put them side by side to make a single 2048x1024 texture, then probably scale it down to 1024x512

25.3.12

been sick. did this.

23.3.12

quick zbrush rock

18.3.12

17.3.12

14.3.12

in udk, not cryengine. cryengine wont start for me :(
hopefully when i get some trim/skirting in the ambocc wont be so ugly on the bottom.

The walls material is completely tiling, and uses vertex colours to blend between plaster and concrete. I tried using bumpoffset to get the concrete to look a lot more inset, but I can't seem to get it to make much difference :( Hopefully when all the props are in it wont show so much.

11.3.12

low poly, textures. 1146 tris, 1024 textures x3.

10.3.12

radio for the scene. just high poly for the moment.
blockout for now.

8.3.12

4.3.12


uv'd and baked to 2048x1024. probly end up scaling it down to half that.
want to end up with a texture as good as this: http://skins.thanez.net/tut_coloring/after.png

1.3.12

28.2.12

24.2.12

12.2.12

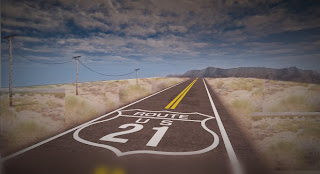
Workin on this scene in UDK to test out deserty/road type scenarios for an as yet unannounced project :P

 So this is the kinda thing I'm shooting for, mocked up with a little photoshop.


So there will be a bunch more props to make, like this telegraph pole,


but the most interesting thing is the road material.
Whilst the road markings like the yellow lines are done with decals, all the rest of the textures are tiling textures, blended with vertex paint.
Heres a peak at the material, and a breakdown of how it works.


The big chunk on the bottom is straight out of this tutorial: http://www.chrisalbeluhn.com/UDK_Advanced_Vertex_Painting.html, which I use to make the transition between the two different desert textures look nice.
 The other advantange of this technique is that it works with much lower density meshes whilst still looking good, as the differences are modulated with a texture.


 Another thing I used that I stole from that tutorial was simply plugging the vertex colour for the asphalt texture into a power node and a constant clamp, which makes it a much sharper edge transition. It would have been nice to rough up the asphalt edges in the same way as the cracked sand transition, but I don't think it's really necessary, especially as I plan to cover it up with some simple roadside props and foliage.

The other interesting thing about the material is that I use WorldPositionOffset to make those hilly bits in the distance. It's nice to be able to paint those hills on quickly and easily with the Vertex Paint tool.
The disadvantage of World Position Offset is that it doesn't affect the collision, or properly accept decals. I had intially used it to make the asphalt a little raised up, but without collision or decals, it looked a little silly.


Because I made some of the material before I fully understood WorldPositionOffset, I had to convert the Red vertex colour into a blue constant, as the colour input to the WorldPositionOffset defines which direction the mesh is offset. To do this, I masked out the Red channel, and multiplied it by a constant3vector of 0,0,1, which turned it into a blue constant.


The next steps will be a handful of extra props, distant mountains, decals to break up the monotony of the road (oil stains etc.), and of course, foliage. Lots of foliage. I haven't ever really done any foliage, so that should be a nice challenge.
Forgot to upload this.